Glacier Hiking Tips: Stay Safe and Prepared
Glacier Hiking Tips: Stay Safe and Prepared

TL;DR:
- Glacier hiking involves trekking across moving ice with crevasses and shifting terrain, requiring guided experience and proper gear.
- Safety depends on following guide instructions, wearing the right clothing system, and choosing hikes appropriate to your fitness level.
Glacier hiking is defined as trekking across the surface of a living, moving body of ice, complete with crevasses, unstable edges, and terrain that shifts daily. The best glacier hiking tips all point to the same foundation: guided experience, the right gear, and physical readiness. Glacier tourism now draws more than 14 million visitors annually to the world’s most popular glacier destinations, driven partly by last-chance travel as one-third of glaciers in UNESCO World Heritage sites are projected to disappear by 2050. That surge in demand makes preparation more critical than ever. Whether you are planning your first introductory walk or a full-day technical hike, the tips below cover everything you need to know before you step onto the ice.
1. Essential glacier hiking tips for gear and clothing
The right gear is the single biggest factor between a comfortable glacier hike and a dangerous one. Three-layer clothing is the industry standard: a moisture-wicking base layer, an insulating mid-layer, and a waterproof outer shell. Each layer has a specific job, and skipping one creates a gap that cold and wet conditions will exploit fast.
What to pack:
- Base layer: Merino wool or synthetic fabric that pulls sweat away from your skin. Cotton fails here because it holds moisture and chills you rapidly.
- Mid-layer: A fleece or down jacket that traps body heat. Packable down works well because it compresses small.
- Outer shell: A fully waterproof and windproof jacket and pants. Rain and glacier spray are constant threats.
- Footwear: Waterproof hiking boots with ankle support and a rigid sole. A rigid sole is required for crampons to attach correctly.
- Accessories: Warm gloves, a wool hat, UV-blocking sunglasses, high-SPF sunscreen, and a neck gaiter. Glacier surfaces reflect intense UV radiation even on overcast days.
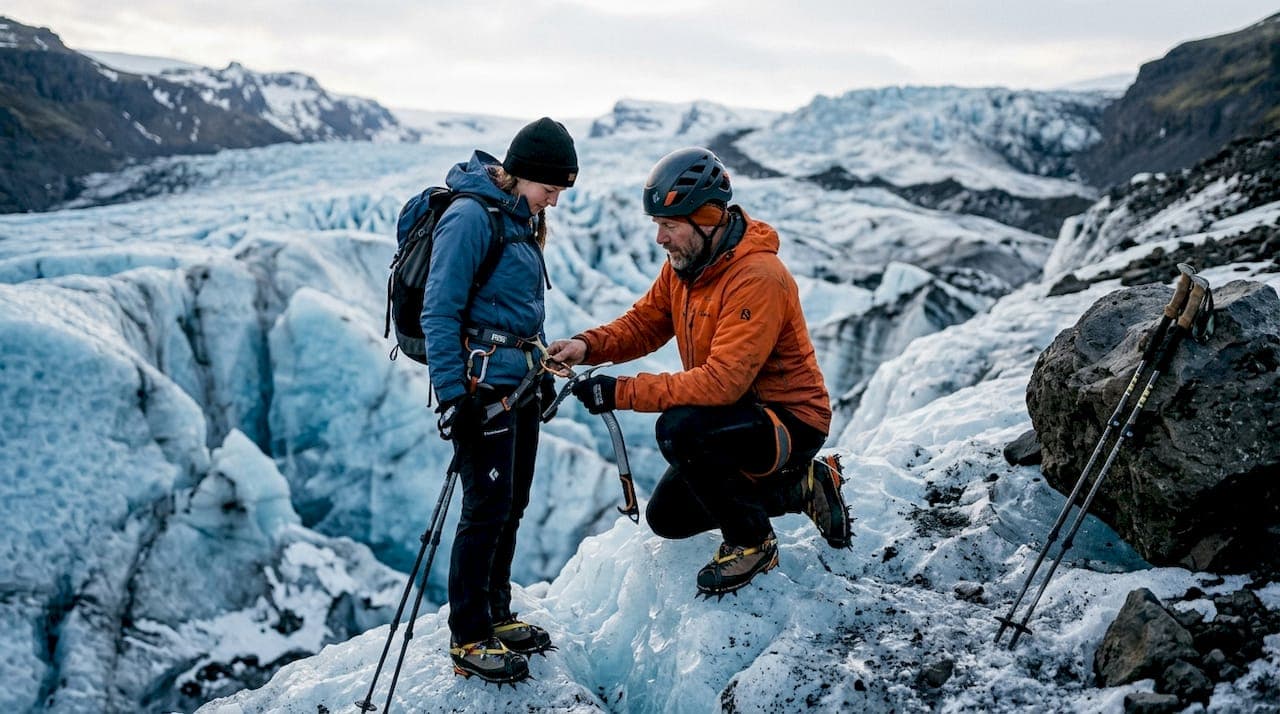
Technical equipment such as crampons, ice axes, and helmets are typically provided by tour operators, along with a safety briefing before the hike begins. You do not need to own this gear to start.
A waterproof daypack in the 15–25 liter range is critical. Once gear gets wet from rain or glacier splash, drying it in cold conditions is nearly impossible. A soaked pack leads to discomfort quickly and raises the risk of hypothermia.

Pro Tip: Pack your dry layers, snacks, and phone in a waterproof stuff sack inside your daypack. Even “waterproof” bags develop weak seams over time.
2. Top safety practices every glacier hiker must follow
Glacier hiking is a managed risk environment. Safe routes shift daily due to glacier dynamics, and a path that was solid in the morning can be compromised by afternoon meltwater. That unpredictability is exactly why solo glacier travel is strongly discouraged by local authorities including Safetravel Iceland.
The core safety rules are non-negotiable:
- Always hike with a certified guide. Independent glacier travel is actively discouraged by local authorities. Rescue operations on glaciers are complex, dangerous, and slow.
- Follow guide instructions on spacing and footholds. Guides set the line for a reason. Bunching up or wandering off the marked path increases crevasse risk for the whole group.
- Respect crevasse warnings. Hidden crevasses covered by snow are the leading structural hazard on any glacier. Never approach an edge out of curiosity.
- Watch your crampon technique. Accidents often begin with overconfidence around crampon handling or slippery ice edges. Walk flat-footed and deliberate, not on your toes.
- Prepare for sudden weather changes. Temperature, wind, and visibility can shift within minutes on a glacier. If conditions deteriorate, turn back without argument.
- Carry bear spray in relevant parks. In areas like Glacier National Park in Montana, bear spray is an inexpensive and effective deterrent when you know proper usage.
- Plan around daylight. Shorter daylight hours in fall and winter compress your safe hiking window. Build in a buffer and never push past your turnaround time.
“Glacier hiking is not a casual stroll. Strict adherence to guide instructions is the single most effective safety measure available to any hiker on the ice.” — Professional mountain guide perspective, Scenic Iceland
3. How to choose the right glacier hike for your level
Not every glacier hike is the same. Routes vary widely from short introductory walks to full-day technical climbs, and choosing the wrong level creates both safety risks and a miserable experience.
Beginner glacier walks
Standard guided glacier walks for beginners last 3–5 hours and require no previous mountaineering experience. The minimum age is typically 10 years. Group sizes are often as small as 8 people, which means guides can give individual attention to crampon technique and footing. These hikes cover blue ice terrain and basic crevasse awareness without technical climbing.
Half-day and full-day hikes
Half-day hikes add more varied terrain, steeper sections, and longer crampon time. Full-day technical hikes require good cardiovascular fitness and some interest in mountaineering movement. Expect 4–6 hours on uneven glacier surfaces, frequent gear adjustments, and exposure to ridgelines and crevasse fields.
Advanced and specialist options
Ice climbing and advanced glacier travel are reserved for hikers with prior technical experience or those joining multi-day mountaineering programs. These are not appropriate for first-timers regardless of general fitness level.
How to evaluate a tour operator:
| Evaluation factor | What to look for |
|---|---|
| Guide certification | Certified by a recognized mountaineering body |
| Group size | Smaller groups (under 12) allow better supervision |
| Gear included | Crampons, helmet, and ice axe provided |
| Safety briefing | Pre-hike instruction on crampon use and hazards |
| Route flexibility | Guides adjust routes based on daily conditions |
Pro Tip: Ask operators directly how they handle route changes when conditions shift. A good operator will have a clear answer. A vague one is a warning sign.
4. How to prepare physically and mentally for glacier hiking
Physical preparation matters more than most first-timers expect. Moving in crampons while wearing layered and sometimes harnessed gear challenges endurance more than raw strength. Pacing is the skill that separates hikers who finish strong from those who struggle in the final hour.
Physical preparation checklist:
- Build lower body strength with squats, lunges, and step-ups for 4–6 weeks before your hike.
- Practice walking on uneven terrain with a loaded pack to simulate glacier movement.
- Work on cardiovascular endurance with 60-minute hikes at a moderate pace, two to three times per week.
- Stretch hip flexors and calves daily. Crampon walking engages these muscles differently than trail hiking.
Mental readiness is equally important. Glacier hikes include frequent stops for gear checks, route assessments, and weather monitoring. Itineraries change without notice. Hikers who resist those changes add stress to the whole group. Accept that the guide’s call is final, and build flexibility into your expectations before you arrive.
Hydration and nutrition on the ice are easy to neglect because cold suppresses thirst. Drink water consistently throughout the hike, not just when you feel thirsty. Pack high-calorie snacks like nuts, energy bars, and dried fruit. Bring more food than you think you need. Cold environments burn calories faster than temperate ones.
Key takeaways
Safe glacier hiking requires a certified guide, a three-layer clothing system, and physical preparation for 3–6 hours of demanding movement on dynamic, unpredictable terrain.
| Point | Details |
|---|---|
| Always use a certified guide | Solo glacier travel is actively discouraged by local authorities and rescue services. |
| Wear the three-layer system | Base, mid, and waterproof shell protect against cold, moisture, and wind on the ice. |
| Match hike level to fitness | Beginners should start with 3–5 hour introductory walks requiring no technical experience. |
| Pack a waterproof daypack | A 15–25 liter waterproof bag prevents gear from getting soaked and causing rapid discomfort. |
| Prepare physically and mentally | Build endurance, practice on uneven terrain, and accept that routes change without notice. |
Trygve’s take: what glacier hiking actually demands
What most hikers get wrong before they step on the ice
I have watched a lot of first-timers arrive at the glacier trailhead with trail runners, a cotton hoodie, and the assumption that crampons are basically just spiky shoes. That mindset is the fastest route to a miserable afternoon.
The thing that surprises people most is not the cold. It is the concentration required. Walking in crampons on uneven blue ice demands constant attention to foot placement. You cannot zone out and enjoy the scenery the way you might on a forest trail. Every step is a small decision. After two hours of that, even fit hikers feel it in their legs and their heads.
What I respect most about well-run guided tours is that the best guides do not just lead you to the photogenic spots. They teach you to read the ice. They point out where the surface color changes and what that means for stability. That knowledge stays with you long after the hike ends.
My honest advice: do not book the longest hike available just because you want the most dramatic experience. Start with a half-day tour. Learn how your body handles crampon movement and cold. Then scale up. The glacier will still be there, and you will enjoy it far more when you are not fighting exhaustion and wet socks at the same time.
— Trygve
Foxhostel: your base for South Iceland glacier adventures
Glacier hiking in South Iceland puts you within reach of some of the most accessible glacier terrain on the planet, including Vatnajökull National Park and Jökulsárlón Glacier Lagoon. Foxhostel sits midway between Vík and Kirkjubæjarklaustur, giving you a direct head start on day trips to these destinations without fighting Reykjavik traffic.

Foxhostel accommodates solo travelers booking individual beds and groups or couples who want to book a full room for privacy. The fully equipped communal kitchen lets you prep your own trail food the night before, and the on-site pizzeria means you have a real meal waiting when you get back. For a full picture of what the South Coast offers beyond the glacier, the South Coast itinerary guide covers the region in detail. Check availability and book your stay at Foxhostel.
FAQ
What is glacier hiking?
Glacier hiking is trekking on the surface of a moving glacier, navigating terrain that includes blue ice, crevasse fields, and unstable edges. It requires crampons, layered clothing, and a certified guide.
Do I need experience to go on a glacier hike?
No prior mountaineering experience is required for beginner glacier walks. Standard introductory tours last 3–5 hours and are suitable for anyone with moderate fitness and a minimum age of 10 years.
What is the most important piece of glacier hiking gear?
Waterproof, ankle-supporting boots with a rigid sole are the most critical personal gear item, as they must be compatible with crampons. Technical gear like crampons and helmets is typically provided by the tour operator.
Is glacier hiking safe?
Glacier hiking is safe when done with a certified guide who makes real-time route decisions. Attempting it independently is strongly discouraged because safe routes shift daily and rescue operations on glaciers are complex.
What should I wear for a glacier hike?
Wear a three-layer system: a moisture-wicking base layer, an insulating mid-layer, and a waterproof outer shell. Avoid cotton entirely, as it retains moisture and accelerates heat loss in cold, wet conditions.
Recommended
- Why Stay Near Glaciers: The Traveler’s Advantage | Fox Hostel – South Iceland
- What Are Icelandic Glaciers? Facts, Types, and Features | Fox Hostel – South Iceland
- Best hikes near Vík: epic trails, views, and insider tips | Fox Hostel – South Iceland
- Comment organiser excursion Vatnajökull : guide pratique | Fox Hostel – South Iceland