Start with Four Nonnegotiable Items When Packing for the South Coast
Start with Four Nonnegotiable Items When Packing for the South Coast
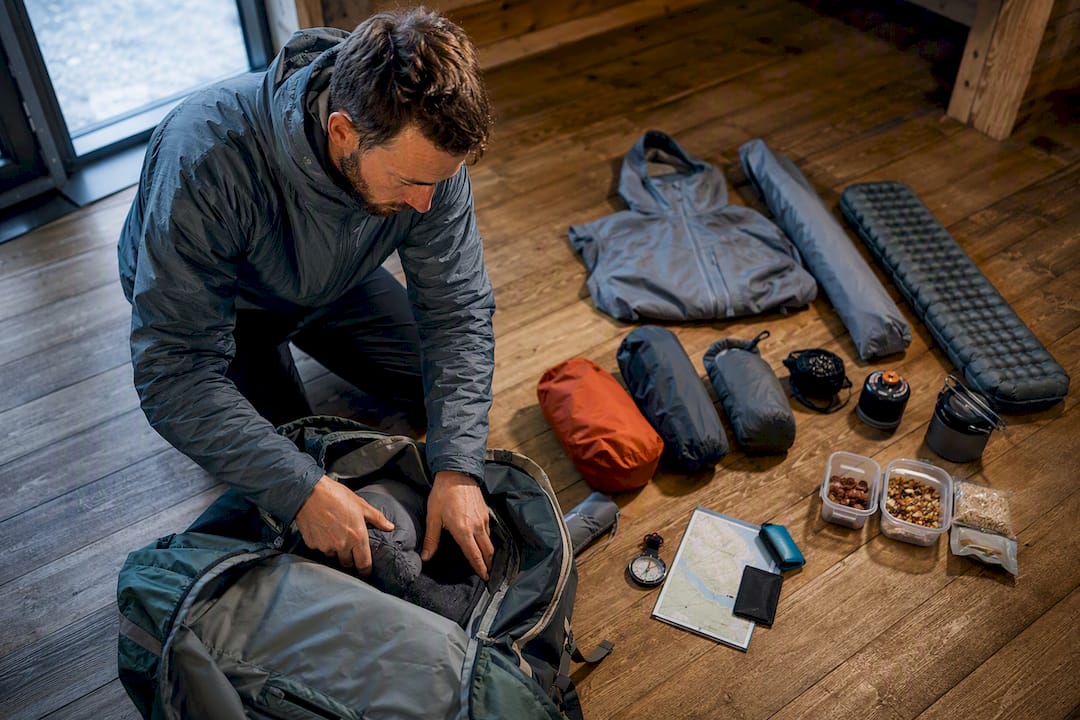
Layer for weather that will change four times before lunch, carry a waterproof breathable shell no matter what the forecast says, and budget three extra days of food and an emergency communicator before anything else goes in the pack. Everything else on your list is negotiable. Those four things are not, and skipping any one of them is how a manageable coastal detour turns into a serious problem on a remote track.
TL;DR:
- Always carry a waterproof, breathable shell, an emergency locator device, a paper map, and a storm-worthy shelter, as rescue access can be slow and weather unpredictable.
- Pack two moisture-wicking base layers, one mid-layer, waterproof over-trousers, and enough dry socks and insulation to stay warm and dry over multiple days.
- Bring enough calorie-dense food and fuel for at least one extra contingency day for every three to four days, accounting for weather delays and extended trips.
- Use waterproof, windproof jackets and separate dry bags for gear to prevent slow, gradual dampness that can lead to hypothermia during extended coastal treks.
- Opt for durable, wind-rated tents with full guy-out points, and a sleeping bag rated for the coldest expected night, prioritizing safety and insulation over weight savings.
Table of Contents
- What Should Be on Your South Coast Packing List?
- How Should You Layer Clothing for Coastal Weather?
- What Shelter and Sleep System Handles Exposed Coastal Nights?
- How Much Food, Fuel, and Water Do You Need Each Day?
- How Do You Choose Footwear for Mud, Rock, and River Crossings?
- What Safety Gear and Navigation Tools Do You Need?
- How Do You Pack and Distribute Weight for Coastal Terrain?
- How Does Season and Remoteness Change Your Gear List?
- How a Nearby Base Changes What You Actually Carry
- A Packing Philosophy Worth Repeating
- Staging Your Trek from a Comfortable Base Near Vík
- Where to Go for Maps, Routes, and Further Planning
- Sources
- FAQ
What Should Be on Your South Coast Packing List?
A prioritized list beats a long, unordered gear dump every time, because on a remote coastal track you make decisions under time pressure, wet hands, and fading light. Rank items by consequence, not by category, and pack in that order.
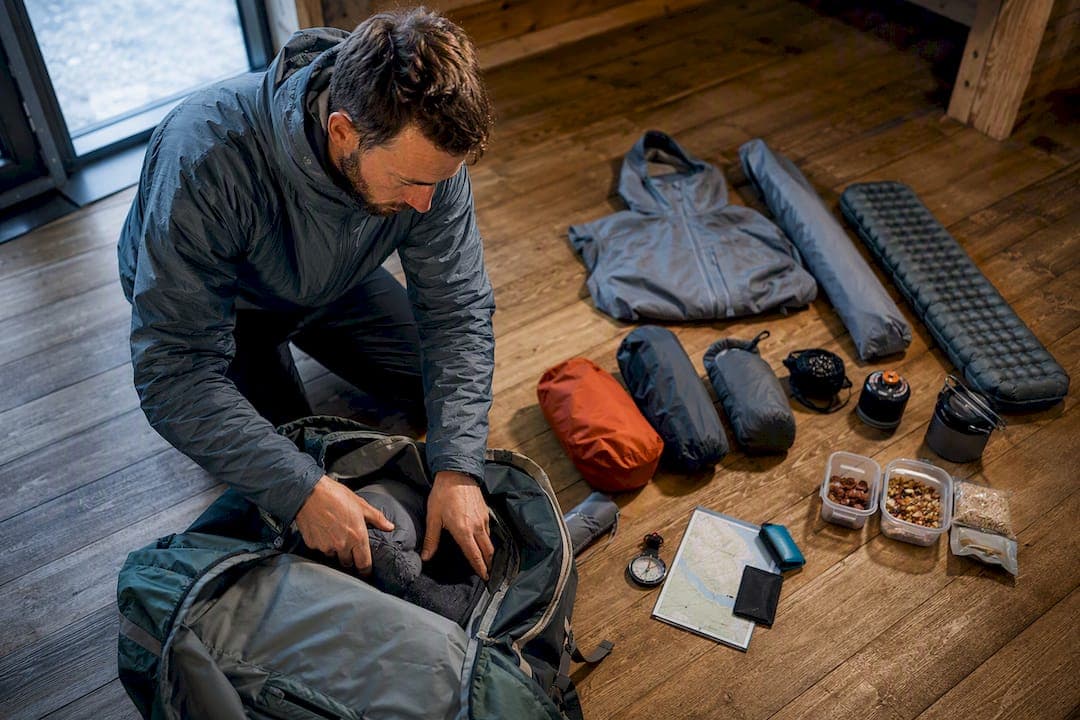
Tier one, non-negotiable, covers survival and navigation. A personal locator beacon or satellite messenger, a paper map and compass, a storm-worthy shelter, and a full waterproof shell system top the list. A detailed gear list from South Coast Track hikers treats these as baseline, not optional, precisely because rescue access on remote coastal terrain is slow and weather turns without warning.
Tier two covers your clothing and sleep system, counted in pieces rather than described vaguely. Plan on two base layers, one insulating mid-layer, one hard shell, three to four pairs of socks, and a sleeping bag rated at least 5 degrees Celsius below the coldest night you expect. A sleeping mat with a real insulation value belongs here too, not in the “nice to have” pile.
Tier three is your cook system and food buffer. Bring a reliable stove, enough fuel for your planned days plus one spare day, and calorie-dense food with a genuine contingency margin built in. Planning guidance for very remote coastal routes consistently recommends adding contingency days rather than trimming margins, because tide delays and weather windows routinely push trips a day or two past schedule.
Tier four is comfort, and it earns its weight only after tiers one through three are settled. A camp pillow, a paperback, or a folding stool are fine additions once your pack already carries full safety margins. If you are debating between a second book and a spare fuel canister, the fuel wins every time.
A rough weight and volume rule works well as a gut check: your tier one and tier two items should occupy roughly 70 percent of your usable pack volume before you add anything else. If comfort items crowd out your rain gear, something needs to come out.
Pro Tip: Lay every item on the floor before you pack, split into the four tiers, and photograph the pile. You will spot redundant gear immediately, and you will have a record for your next trip.
How Should You Layer Clothing for Coastal Weather?
Skip cotton entirely. It holds water, dries slowly, and pulls heat from your body once wet, which is the opposite of what you need on an exposed coastal track where conditions swing from sun to sideways rain within an hour.
Merino wool and synthetic fabrics dominate for good reason. A layering system built around a merino base, synthetic insulation, and a packable hard shell handles that variability while staying compact enough to fit in a carry-on bag, and the same logic scales directly to a multi-day pack. Each piece should do double duty: your base layer works as sleepwear, your mid-layer works around camp, and your shell works in wind, rain, and as a windbreak when the sun is out but the wind is not cooperating.
For a four or five-day trip, aim for these counts:
- Two moisture-wicking base layer tops, one to sleep in and one to hike in.
- One merino or synthetic mid-layer for insulation at camp and in cold wind.
- One fully waterproof, breathable shell jacket with taped seams and pit zips for ventilation.
- One pair of waterproof over-trousers, non-negotiable near waterfalls, river spray, or coastal mist.
- Three to four pairs of hiking socks plus one dedicated dry pair reserved only for sleeping.
- One spare set of dry base layers, sealed in a dry bag and never touched until camp.
The shell matters more than almost anything else you pack. Guides covering unpredictable coastal weather note that a waterproof, windproof shell with taped seams is treated as a safety item, not a convenience, because sustained wind combined with rain drops your core temperature fast even in summer conditions. Over-trousers matter just as much as the jacket hood. Anywhere your route crosses near waterfalls, tidal spray zones, or dense coastal fog, your legs get soaked from below just as fast as your torso gets soaked from above.
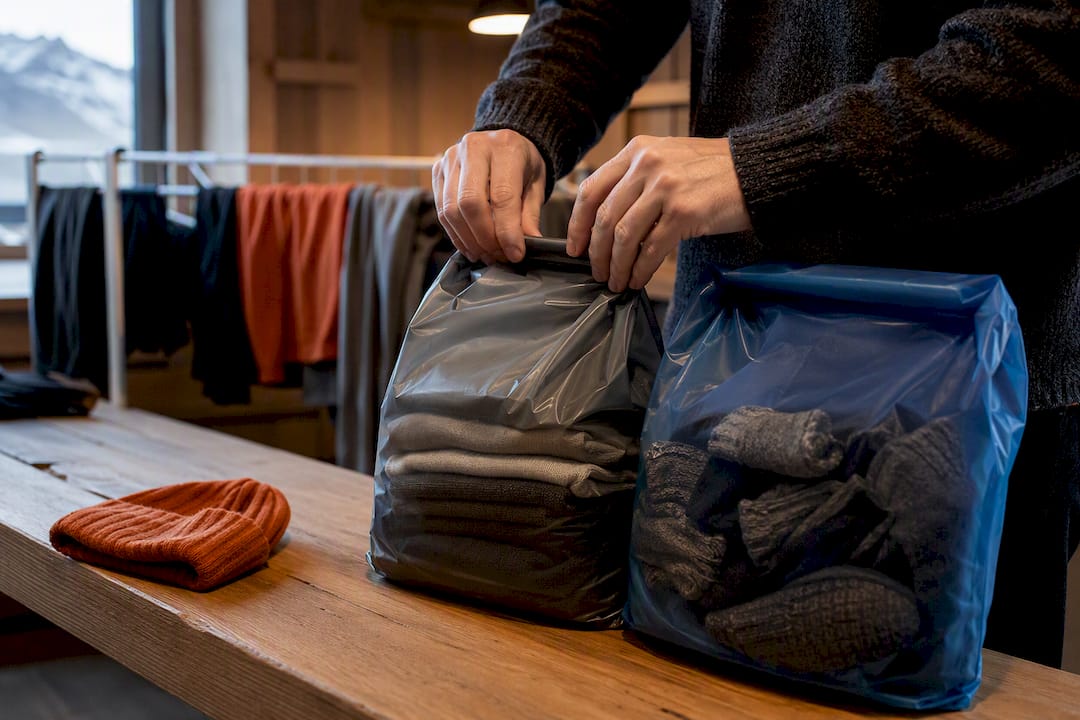
The rule that keeps you functional after day two: one outfit stays dry, always. Seal it in its own dry bag, mark it clearly, and never wear it hiking, even on a short detour. Everything wet, including yesterday’s socks, goes in a separate bag so it never touches your dry layers. That single habit prevents the slow, demoralizing slide into being permanently damp, which is how minor discomfort becomes a real risk on longer routes.
What Shelter and Sleep System Handles Exposed Coastal Nights?
Choose a tent rated for real wind exposure, not a casual three-season model built for sheltered campgrounds. Coastal terrain offers almost no windbreaks, and a tent that flexes badly or lacks solid guy-out points will keep you awake and, in a bad blow, can fail outright.
Prioritize these features:
- A freestanding or semi-freestanding design rated for four-season or strong three-season wind loads.
- Full guy-out points and the discipline to actually use them, staked into rock anchors where the ground is too thin for pegs.
- A vestibule large enough to store wet boots and a pack outside the sleeping area, keeping condensation and mud out of your bag.
- A double-wall construction to manage condensation, since single-wall tents struggle in the humid air common near coastlines.
For your sleeping bag, match the rating to your coldest expected night, then add a margin rather than cutting it close. Synthetic fill holds a real advantage over down here: it keeps insulating even when damp, which matters on a route where spray, condensation, and unexpected rain are constant threats to a bag’s loft. A lightweight liner adds several degrees of warmth without much added weight, and it also keeps the bag itself cleaner over a multi-day trip.
Your sleeping mat deserves more attention than most hikers give it. Look for an R-value of at least 3.5 for shoulder-season coastal trips, higher if you expect ground frost. Insulation underneath you does more for a warm night’s sleep than an extra layer on top, because the ground pulls heat away far faster than still air does.
The trade-off is straightforward: a slightly heavier tent and mat that keep you warm and dry beat a featherweight setup that fails on the one night the wind actually picks up.
How Much Food, Fuel, and Water Do You Need Each Day?
Plan on 2,800 to 3,500 calories per person per day for sustained multi-day hiking with a loaded pack, leaning toward the higher end in cold, wet conditions where your body burns extra energy just staying warm. Freeze-dried dinners, nut butter, dense trail mix, and hard cheese deliver the calorie density you need without adding excessive weight.
- Calculate your base food weight per day, then add one full contingency day for every three to four days on the track, following the same logic that experienced planners apply to remote coastal routes where weather and tide delays commonly extend trip length.
- Estimate stove fuel at roughly 50 to 70 grams per person per day for a canister stove boiling water for meals and hot drinks twice daily, then carry one spare canister for the whole group as a buffer against a longer trip.
- Treat every water source unless you know it is a protected spring. Filter for cloudy or high-turbidity water, and carry a backup chemical treatment or the ability to boil, since filters can clog or freeze in cold conditions.
- Store all food in an odor-proof bag or hard-sided container away from your tent, even on tracks without major wildlife concerns, since rodents and birds are opportunistic almost everywhere.
Group cooking saves real fuel weight compared to everyone running an individual stove, but it slows down your morning routine and demands more coordination when someone wants to eat and move fast. For groups of three or more, one shared stove plus one backup makes more sense than four separate setups.
Pro Tip: Pre-portion your dinners into individual bags labeled by day before you leave. It removes decision fatigue at camp and makes it obvious immediately if you are running short on contingency food.
How Do You Choose Footwear for Mud, Rock, and River Crossings?
The boots-versus-trail-runners debate comes down to your route’s water exposure, not personal preference. If your track includes sustained bog, estuary crossings, or river fords, waterproof boots with a stiff sole and solid ankle support outperform trail runners, which soak through in minutes and offer far less protection on uneven, rocky ground.
If your route stays mostly dry with only occasional wet sections, breathable trail runners paired with gaiters can work well and save real weight over a multi-day trip. The deciding factor is how often your feet will be fully submerged rather than just damp.
- Run a two-sock system: a thin liner sock to wick moisture, a cushioned hiking sock over it to reduce friction and blisters.
- Carry two spare pairs beyond what you are wearing, rotate them daily, and dry wet socks on the outside of your pack whenever the sun cooperates.
- Pack a basic blister kit: adhesive pads, a small roll of tape, and a needle for lancing hot spots before they become open blisters.
- Bring lightweight camp shoes, sandals or a pair of Crocs work well, so your feet dry out and recover fully once you stop hiking each day.
For estuary or river crossings, timing matters as much as footwear. Cross at low tide or early in the day whenever possible, since water levels and current strength both drop significantly during those windows. Unclip your pack’s hip belt before entering moving water so you can shed the pack quickly if you slip, and cross at an angle facing upstream rather than fighting the current head on.
What Safety Gear and Navigation Tools Do You Need?
A personal locator beacon activates a dedicated distress signal and works purely as an emergency trigger, while a satellite messenger like a Garmin inReach allows two-way texting and daily check-ins alongside its SOS function. For a multi-day remote coastal trek, the two-way messenger is generally worth the extra cost, because it lets you report a delay before it becomes a search-and-rescue situation.
Set realistic expectations on rescue timing. On a genuinely remote coastal track, even a fast beacon activation can mean many hours before help physically arrives, since access is often only possible by boat or helicopter and both depend on weather.
Your first aid kit needs to cover more than blister care: include a compression bandage, blister treatment, pain relief, antihistamines, any personal prescription medication with a few spare days built in, and a basic understanding of hypothermia symptoms, since cold-water exposure risk is real on coastal routes.
- Carry a paper topographic map and compass as your primary navigation tool, with a GPS app on your phone as backup, never the reverse.
- Download offline map layers before you lose signal, and carry a spare battery pack dedicated solely to navigation devices.
- Where your route crosses tidal flats or estuaries, carry a printed tide table. Route planners emphasize planning by time rather than distance on remote coastal tracks, since tide windows and rough terrain both distort how long a segment actually takes.
- Leave a detailed trip plan with someone not on the trip, including your route, expected check-in times, and the point at which they should raise an alarm if they hear nothing.
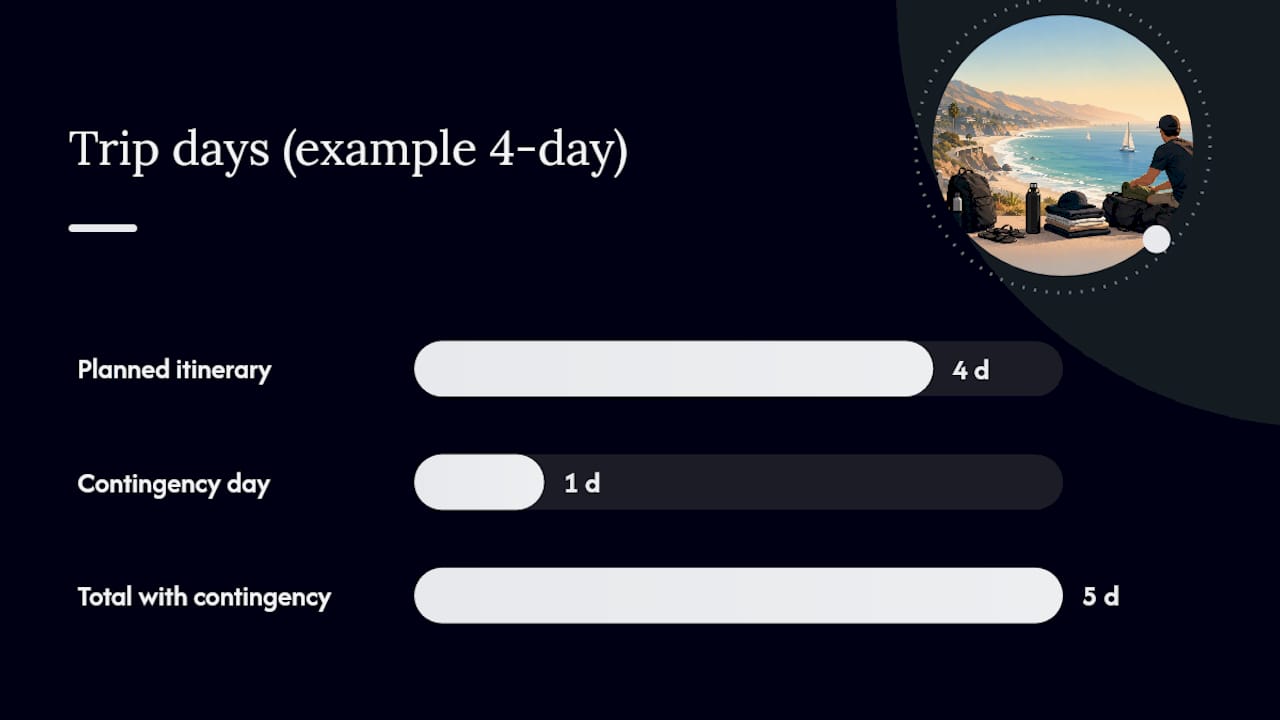
Build one full contingency day into every itinerary of four days or longer. It is the single easiest safety margin to add, and it costs you almost nothing if you never need it.
How Do You Pack and Distribute Weight for Coastal Terrain?
Pack heavy items close to your spine and centered between your shoulder blades, not high and loose or sagging low near your hips. On uneven coastal terrain, a poorly balanced pack throws off your footing exactly when you need stability most, on wet rock, loose scree, or a narrow track edge above the surf.
- Load your sleeping bag and any rarely used items at the bottom, your heaviest gear (food, water, stove) in the middle against your back, and your rain gear, snacks, and first aid kit on top for fast access.
- Choose a slightly smaller, narrower pack profile over a bulky one. Experienced trip reports note that a tighter pack profile helps significantly on tracks with dense vegetation, deadfall, or narrow squeeze sections, where a wide pack simply will not fit through.
- Line your main compartment with a pack liner or use individual dry bags for clothing and sleep gear rather than relying on the pack’s own water resistance, which fails eventually in sustained rain.
- Avoid strapping gear to the outside of your pack. Anything hanging externally snags on brush, gets soaked immediately, and can shift your balance on exposed sections.
A reasonable target for a four to five-day self-sufficient coastal trip sits between 15 and 18 kilograms fully loaded with food and water, depending on your gear choices and body size. Small swaps compound fast. Choosing a lighter mat, a smaller stove, or trimming redundant clothing can each shave real weight, and those savings add up across multiple days in a way that makes climbs and long push days noticeably easier. Train by carrying your loaded pack on a few practice hikes before your trip, not just walking around with it empty.
How Does Season and Remoteness Change Your Gear List?
The more remote your track, the more conservative your margins should be, full stop. A route with resupply points every day needs far less contingency food than a track where you are three days from the nearest road in any direction.
- On highly remote sections, add an extra half day of food per contingency day already built in, and carry one full spare fuel canister beyond your calculated need.
- In shoulder season or colder months, add ice cleats if your route includes frosted boardwalks or icy descents, pack a warmer sleeping bag, and bring a headlamp with genuinely fresh batteries since daylight hours shrink fast.
- Wherever your route crosses tidal estuaries, carry a current tide table and plan every crossing for low tide or the first few hours after sunrise, when conditions are most predictable.
- Build a firm decision rule before you leave: if a severe weather warning covers your window, or a scheduled crossing falls at a dangerous tide stage with no safe alternative timing, postpone rather than push through.
Track remoteness should shape your entire kit list before you shape it around personal preference. A three-day trip near frequent access points tolerates more flexibility than a five-day route through genuinely isolated terrain.
How a Nearby Base Changes What You Actually Carry
Staging a multi-day trek from a fixed base near the trailhead lets you carry a lighter daypack for shorter loops and resupply between longer segments, instead of hauling full self-sufficiency gear for an entire trip. A nearby base positioned conveniently between nearby towns can put hikers within easy reach of South Coast trailheads without needing a fully loaded pack for every outing.
Items that stay safely at a base rather than riding in your pack: spare clothing sets, backup footwear, non-hiking gear, and any food you plan to cook rather than carry. A communal kitchen at the base means you can cook a real dinner after a long day instead of relying solely on freeze-dried meals, and dorm-style rooms, bookable as single beds or full private buyouts, give solo hikers and groups alike a place to dry gear and reset before the next segment.
What still has to come with you: everything from the tier one and tier two lists above. A comfortable base changes your logistics; it never replaces your shell, your navigation kit, or your emergency communicator on the trail itself.
A Packing Philosophy Worth Repeating
The three mistakes I see most often on remote coastal treks are carrying gear that never earns its weight, ignoring tide planning until it becomes an emergency, and packing food for the trip you hope to have instead of the one bad weather might actually give you.
None of those mistakes come from lacking gear. They come from misjudging priority. My philosophy after working through this list section by section is simple: pack for conditions and emergencies first, comfort second. Everything else sorts itself out once that order is set.
— Siggi
Staging Your Trek from a Comfortable Base Near Vík
Fox Hostel works as a practical staging point for hikers tackling South Coast day hikes and shorter treks, giving you a place to drop excess gear, cook a proper meal, and dry out wet layers before heading back onto the trail. The hostel’s location between Vík and Kirkjubæjarklaustur puts you within striking distance of coastal trailheads while keeping you clear of the crowds closer to town.

Its large communal kitchen means you are not stuck reheating freeze-dried meals every night, and its dorm-style setup gives solo hikers the option to book a single bed while couples, families, or small trekking groups can buy out an entire room for privacy. If you are planning a multi-day itinerary through the South Coast, our guide to structuring a South Coast itinerary walks through how to sequence your days around a fixed base like this one. Check current room availability or look into group bookings if you are traveling with a full crew, and lock in your dates before your trekking window arrives.
Where to Go for Maps, Routes, and Further Planning
Beyond this checklist, a few specialist sources are worth bookmarking before you finalize a route.
- The South Coast Track gear list from experienced hikers offers a deeper breakdown of remote-track self-sufficiency gear.
- Trip-planning notes from Slower Hiking cover realistic time budgeting and tide-aware scheduling.
- Iceland’s month-by-month packing guide helps you adjust your kit for seasonal shifts.
- The IS 50V geospatial dataset from the Icelandic Institute of Natural History provides official 1:50,000 map data for readers who want technical route-planning layers beyond a standard trail map.
Sources
- South Coast Track Gear List - What to pack
- South Coast Track planning and tips — Slower Hiking
- Layering system for Iceland’s unpredictable weather that fits in carry-on | MestoGo
- What to Pack for Iceland: A Month-by-Month List | Map of Iceland
- IS 50V geospatial base-map data — Natural Science Institute of Iceland
FAQ
What Is the 5-4-3-2-1 Packing Rule?
The 5-4-3-2-1 rule is a rough counting method some travelers use: five pairs of socks, four tops, three bottoms, two pairs of shoes, and one hat, scaled up or down by trip length. For a South Coast multi-day trek, use it only as a loose starting frame and prioritize the tiered essentials checklist above, since safety and shelter items matter more than hitting an exact count.
What Is the 3-5-7 Rule in Packing?
The 3-5-7 rule suggests packing multiple bottoms, tops, and pairs of underwear or socks for a week-long trip, adjusted proportionally for shorter outings. It works fine for general travel, but a remote coastal trek needs fewer clothing pieces and more contingency food, fuel, and safety gear than this rule accounts for.
What Should You Never Forget for a Coastal or Beach Trip?
Never leave without a full waterproof shell, sun protection, and a way to call for help if things go wrong, since coastal weather shifts fast in both directions, sun to storm and back. For multi-day South Coast treks specifically, add a satellite messenger or PLB and at least one spare day of food to that short list.
What Do You Need to Pack for a Coast-to-Coast or Multi-Day Coastal Hike?
A multi-day coastal hike needs a storm-worthy shelter, a sleep system rated for your coldest expected night, a full clothing layering system built around merino or synthetic fabrics, and enough food and fuel plus contingency days for weather delays. Staging some of that gear from a fixed base like Fox Hostel before or after longer segments can reduce how much you carry on shorter day sections.
How Much Food Should You Pack Per Day on a Remote Coastal Trek?
Plan on roughly 2,800 to 3,500 calories per person per day for sustained hiking with a loaded pack, using freeze-dried meals and calorie-dense snacks to keep weight manageable. Add one full contingency day of food for every three to four days on the track to cover weather or tide-related delays.